What's in the case
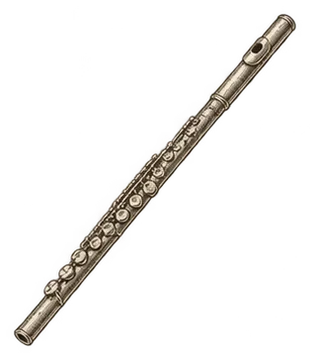
A flute comes apart into three pieces: the headjoint, the body and the footjoint [1][3]. The cleaning rod lives in the case with them [1].
| Part | What to know |
|---|---|
| Headjoint | The piece you blow across. It carries the lip plate and the embouchure hole, with the crown (Yamaha calls it the head screw) on the closed end [1][3]. |
| Body | The long middle piece with most of the keys. The short stretch at the top with no keys is where you hold it [1]. |
| Footjoint | The short end piece with the D♯, C♯ and low C keys [3]. Your right little finger plays its first key [1]. |
| Cleaning rod | Dries the inside after you play. The cloth goes over its tip so no metal shows [1][5]. |
| Swab | Silk or microfiber, usually with a weighted string. If your flute didn't come with one, get one [1]. |
A flute's joints get no grease. Sweetwater is blunt about it: no grease or oil on a flute's joints, ever [1]. Yamaha explains why. Grease picks up dirt and dust, the joints are made to fit within a few microns, and in bad cases greased joints can stick together [6]. If you're coming from clarinet or sax, leave the cork grease habit with that case.
Before you start
Set the case flat on a table, right side up, with the logo on the lid facing the ceiling [1].
Wash your hands and face first, since skin oils tarnish the metal, and take off rings that could scratch it [1]. Sweetwater also says not to eat right before playing, and to brush your teeth and rinse your mouth [1].
Then wipe the ends of all three pieces with a cloth to get rid of dust and dirt [2]. That same wipe, inside and outside the joint, is Yamaha's first fix for a joint that has started to feel stiff [6].
Putting it together
Sources disagree on which end goes on first. Sweetwater and Yamaha's playing guide attach the footjoint first [1][4]. Yamaha's flute attachment manual and Sage Music start with the headjoint [2][7]. Either order works as long as your hands stay off the keys. These steps do the footjoint first.
- Hold the body by the top. Take it out of the case by the short keyless stretch at the top end, which Sweetwater calls the barrel [1]. Sage Music's reason: squeezing the keys can damage the flute [7].
- Hold the footjoint by the bottom. Pick it up at its far end, where there are no keys [1].
- Twist the footjoint on. Keep the two pieces in a straight line [9] and ease them together with a slight back-and-forth twist [1][7]. Yamaha Music UK's advice is to twist the pieces into place instead of pushing straight on, and never to use force [8].
- Line up the footjoint. Turn it until the long rod on the footjoint's keys points at the middle of the lowest key on the body [1][7]. Yamaha's manual describes the same line: the footjoint's key posts centered on the body's keys [2]. Some flutes have tiny arrows engraved on the joints for this. If yours does, match them up [1].
- Pick up the headjoint near its open end. Keep your fingers off the lip plate [2][9]. Sage Music holds it close to the open end, the end that goes into the body [7].
- Twist the headjoint in, then back it out a little. Slide it in with the same gentle twist [2], then pull it back out about 5 mm, roughly 3/16 inch [2]. Sweetwater's version is simply not to push it all the way in, because the exact spot gets set when you tune [1].
- Line up the embouchure hole. Turn the headjoint until the hole lines up with the row of keys on the body [7][8]. Sweetwater uses the first key on the body as the target [1]. To check it, Sage Music suggests holding the crown up at eye level and looking down the length of the flute [7]. If your headjoint and body have alignment marks, match those [2].
- Put it down keys up. When you set the flute down, lay it on a stable surface with the keys facing up [2].
Where your hands go matters more than the order. Gripping the keys can bend the small mechanisms that move them [7], and Yamaha Music UK calls holding the flute by its keywork one of the fastest ways to knock it out of alignment [8]. Yamaha's own playing guide warns that a flute that isn't put together properly can break, or stop making a good sound [4].
Tuning with the headjoint
How far the headjoint sits out of the body sets the flute's tuning [1][2]. Sweetwater's method uses the middle G. If it's sharp, move the headjoint out a tiny bit. If it's flat, push it in a tiny bit, and the pitch rises [1]. Move it in small steps, check that the embouchure hole is still lined up after each one, and play the note again.
Leave the crown alone while you do this. Sweetwater says not to unscrew it: there's an adjustable cork inside the headjoint, and your teacher will tell you if it ever needs moving [1].
The flute tuner listens through your device's microphone, and the tuning guide explains how to read the needle.
Worked example: from a closed case to Hot Cross Buns
Here's a first session on a student flute, start to finish.
- Case flat on the table, logo up [1]. Hands washed, rings off [1].
- Wipe the ends of the headjoint, body and footjoint with a cloth [2].
- Body by its keyless top, footjoint by its keyless bottom. Twist them together and point the footjoint rod at the middle of the body's lowest key [1][7].
- Headjoint in with a twist, then out about 5 mm [2]. Turn it until the embouchure hole lines up with the first key [1], then sight down from the crown to check [7].
- Open the flute tuner and play the middle G. Say it reads 15 cents sharp: pull the headjoint out a tiny bit and play the G again. If it reads flat, push the headjoint in a tiny bit [1]. Each time, check that the hole is still in line.
- Play Hot Cross Buns. The site's flute version is written in B♭ major, so the whole song uses three notes, D, C and B♭, and the flute chart has a card for each one.
If you get air but no tone, go back to the headjoint on its own. The first-sound guide starts there and works back up to the whole flute.
Taking it apart
Sweetwater's advice is not to leave the flute put together once you've finished playing [1]. Take it apart in reverse and dry it as you go.
- Headjoint off. Hold it near the open end and the body by its keyless top, and twist it out [1][7].
- Dry the headjoint. Cover the rod's tip with the cloth so no metal shows, because bare metal can scratch the inside [1][5]. Push it in from the open end and stop as soon as you see the cloth in the embouchure hole [1]. Then put the headjoint in its place in the case [1].
- Swab the body and footjoint. Sweetwater's way is to hold them upright, drop the weighted string through, and pull the swab after it [1]. If you use the rod and gauze instead, turn the rod in the same direction the gauze is wrapped [5]. Yamaha also says a flute swab can go through with the flute still assembled [5].
- Footjoint off. Bottom of the footjoint in one hand, top of the body in the other, and twist [1][7].
- Wipe the outside. Run a polishing cloth along the body without pressing on the keys [5].
- Close it up. Each piece goes in its own slot. Let the wet swab dry outside the case instead of packing it in with the flute [1].
If a pad looks wet, slip a piece of cleaning paper between the pad and the tone hole and press the key lightly a few times, without letting the key shove the paper out of place [5]. Yamaha's longer schedule adds a tone hole cleaner under the keys every week and a key check and a little key oil every month [6]. The woodwind cleaning guide walks through both, along with checking the headjoint cork with the line on the cleaning rod.
Piccolo
A piccolo has two parts, the headjoint and the body, so there's no footjoint to line up [11].
- Hold the solid parts. Music & Arts has you hold the headjoint firmly in one hand and the body's barrel in the other [11]. Just Flutes, a London flute shop, gives the same grip: the body above the mechanism, the headjoint below the embouchure hole [10].
- Twist, don't rock. Bring the pieces together straight on, not at an angle, with a gentle twist [10][11].
- Look at the joint before you grease anything. A flute's joints never get grease [6]. A piccolo joint with a cork band is different: Just Flutes says to keep that cork smooth and lubricated with cork grease [10].
- Keep fingers out of the hole. Never hook a finger in the embouchure hole to lift the headjoint out of the case [10].
- Wooden piccolos and cold. Never warm up a wooden piccolo by blowing into it, because it can crack [11]. Warm the headjoint in your hands instead [10], and keep the case insulated when you go from a warm building into the cold [10].
- Swab it after every use [11]. Just Flutes recommends a silk oboe swab with a string and weight [10].
Fingerings for every note are on the piccolo chart.
Common mistakes
- Gripping the keys or rods. It can bend the key mechanism [7] and pull the flute out of line [8].
- Pushing a joint on with no twist. Twist it gently, and never force it [8].
- Greasing the joints. Grease collects dirt and, in bad cases, makes the joints stick together [6].
- Holding the headjoint by the lip plate. Hold it near the open end [2][7].
- Leaving the headjoint pushed all the way in. Back it out about 5 mm and tune from there [1][2].
- Unscrewing the crown to tune. The cork inside the headjoint is your teacher's call [1].
- Pushing the cleaning rod past the embouchure hole. Stop when the cloth shows in the hole [1].
- Leaving metal showing on the rod tip. Cover it completely with the cloth [1][5].
- Laying the flute down with the keys underneath. Keys face up, on a stable surface [2].
- Leaving it put together after you play [1].
- Packing a wet swab in the case. Let it dry first [1].
If a joint is still stiff after you've wiped the inside and outside of both pieces, don't force it and don't grease it [6][8]. That's the point where Yamaha says to take it to a music store [6].
Sources
- Flute Quickstart Guide, Sweetwater
- Basics for Flute Playing, Yamaha ASTFL Flute Assist Attachment User Guide
- The Parts of the Flute, Yamaha Musical Instrument Guide
- Playing the Flute, Yamaha Musical Instrument Guide
- Care and Maintenance of a Flute: After Playing, Yamaha Musical Instrument Guide
- Care and Maintenance of a Flute: Periodic Maintenance, Yamaha Musical Instrument Guide
- Assembling Your Flute the Safe and Professional Way, Sage Music
- How Do I Assemble a Flute?, pBone Music with Yamaha Music UK
- How to Assemble a Flute, Sound House
- Piccolo Care and Maintenance (PDF), Just Flutes
- An Introduction to the Piccolo, Music & Arts