A fingering chart pairs two things: a note on the staff and a picture of what your hands do to get it. Once you can read both halves, any chart for any band instrument stops looking like a puzzle. The woodwind diagrams carry the most detail, so they come first. Brass charts are simpler and follow after.
The staff note comes first
Every entry on a chart starts with a note written on a staff. Read that note the way you would in your music: line or space, plus any sharp or flat in front of it. On the clarinet chart, a note on the second line of the treble staff is G4, and with a sharp in front it becomes G♯4. Middle C is C4, sitting on one ledger line below the treble staff.
The diagram under the note shows the fingering for exactly that written note. If two notes share a key on the instrument (G♯ and A♭, for example), many charts show both spellings over a single diagram, because the fingering is the same.
One thing trips up a lot of students: the note on the chart is the note in your part, which is not always the pitch that comes out. More on that below.
Reading a woodwind diagram
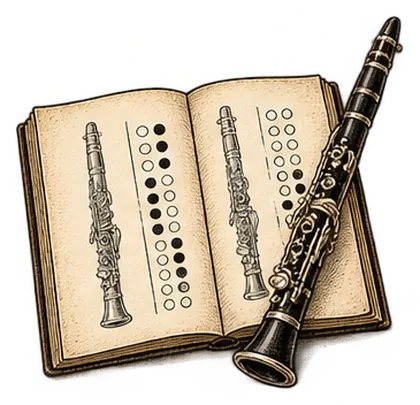
Woodwind diagrams are drawn as a column of circles and smaller key shapes, top to bottom, the way the instrument hangs in front of you. The left hand is on top and the right hand below. On the charts on this site a dashed line separates the two hands.
Filled and open
A filled circle means the hole is covered or the key is pressed. An open circle means leave it alone. The Woodwind Fingering Guide, a long-running reference chart site, builds its legend on the same idea: every hole or key is marked open or closed, with a separator between the left-hand and right-hand keys [1].
So a clarinet diagram with the thumb circle and all six finger circles filled means every tone hole on the front and back is covered.
Half-holes
Some instruments need a hole only partly open. Oboists use the left index finger for a half-hole on the notes just over the break, C to D being the classic spot [15]. Recorder players do something similar with the thumb, partly uncovering the back hole by sliding or rolling it off, a move usually called pinching [2].
Charts show a half-hole as a circle that is half filled. Read it literally: half covered. On the oboe chart, the half-filled first finger tells you to roll the finger so the small hole at the top of the plate is open.
Register and octave keys
These keys sit near the left thumb and change which register the same fingers produce. A saxophone has an octave key that raises the lower notes by an octave [3]. The clarinet's register key works differently: it raises the pitch by a twelfth (an octave plus a fifth) [1]. That is why the clarinet's upper fingerings do not simply repeat the lower ones an octave up, the way sax fingerings do with the octave key. On this site's charts the register or octave key is drawn as a small shape to the left of the first finger, and filled means pressed.
Side, palm and pinky keys
Saxophones have keys you press with the palm or the side of a finger rather than a fingertip [3]. Charts draw these off to the side of the main column. On this site's charts the left and right pinky clusters sit at the bottom of each hand's section. On the alto sax chart the side keys are drawn on the right, and the left pinky table at the lower left.
Because all saxophones use the same key layout and the same written fingerings [3], one diagram works for soprano, alto, tenor and bari. Only the sound changes.
Reading a brass chart
Valve numbers
Trumpets, euphoniums, tubas, mellophones and horns use valves, and charts number them 1, 2 and 3. Valve 1 is the one under your first finger. The first valve lowers the pitch by a whole step, valve 2 by a half step and valve 3 by a step and a half [4]. A chart might show "1-3" or three small circles with the first and third filled. "Open" or "0" means no valves.
The thing to understand is that one valve combination produces several notes. Your lips and air choose between them, so the chart pairs each fingering with a specific staff note to tell you which one you are aiming for.
Trombone slide positions
The trombone chart uses numbers 1 through 7 instead of valves. There are seven slide positions on a tenor trombone, each a half step lower than the one before [5]. First position is the slide all the way in, also called closed position [5]. A "4" on the chart means fourth position, three half steps lower than first on the same partial. The trombone chart shows the position number under each note, and the slide positions guide covers how to find each one by feel.
Written pitch versus sounding pitch
Many band instruments are transposing instruments. A written C on a B♭ clarinet or soprano sax comes out as a concert B♭ [6]. Charts are always drawn in written pitch, the notes in the player's own part. That is why every chart on this site carries a label like "Written pitch. A written C on the B♭ clarinet sounds as concert B♭."
Oboe, trombone, and tuba and euphonium written in bass clef read at concert pitch [16][5][17][18], and the flute is pitched in C [14], so their charts show the note that actually sounds. If you need to know what a written note sounds like, the transposition chart lists every instrument's offset, and the concert pitch guide walks through the conversion.
Alternate fingerings
Many notes can be fingered more than one way [7]. Charts usually show the standard fingering first and list alternates beside it or in a pop-up. An alternate is not a mistake or a lesser option. It might make a fast passage smoother or fix a note that runs sharp. On this site you tap a note to see its alternates, and the alternate fingerings guide explains when to reach for them.
Worked example: three notes, step by step
Clarinet throat A♭
- Find the note. The written note is A♭ in the second space of the treble staff, or G♯ on the second line. Same key, same fingering.
- Read the diagram. The thumb circle is open and the register key is not pressed. All six front finger circles are open too.
- Find the one filled key. It is the small key above the first finger hole, the A♭/G♯ key. The Woodwind Fingering Guide lists this note as the G♯ key alone, nothing else down [8].
- Press it with the side of your left index finger, not the fingertip.
- Know what comes out. The written G♯4 sounds a whole step lower, concert F♯4 (G♭4) [6].
This note belongs to the throat tones, the short stretch of notes that tend to sound thin and run sharp. Clarinet teachers often add right-hand fingers as a resonance fingering to darken the tone and pull the pitch down [9]. On the clarinet chart that version appears as an alternate.
Trumpet low C♯
- Find the note. Written C4 sits on one ledger line below the staff. With a sharp, it is C♯4.
- Read the valves. All three are filled: 1-2-3.
- Do the math if you want to check. Valves 1, 2 and 3 together lower the pitch by 2 + 1 + 3 = 6 half steps [4]. Six half steps below open G4 is C♯4.
- Look for the tip. The chart notes that this note is sharp. Extending the third valve slide when playing 1-3 or 1-2-3 lowers the pitch to bring it in tune [10]. Put a finger in the third valve slide ring and push it out as you play. That ring exists mainly for 1-3 and 1-2-3, which means low D and low C♯ [11].
- Know what comes out. Written C♯4 on a B♭ trumpet sounds concert B3, a whole step lower [10].
The tip on the trumpet chart says to push the slide out farther for low C♯ than for low D. Expect to adjust it every time you play the note until it becomes automatic.
Flute middle D
- Find the note. D5 sits on the fourth line of the treble staff.
- Read the left hand. The thumb key is filled. The first finger circle is open. The second and third finger circles are filled.
- Read the right hand. Fingers 1, 2 and 3 are filled. The Woodwind Fingering Guide gives this note as thumb, left 2 and 3, and right 1, 2 and 3 [12].
- Check the left index. This is the whole point of the fingering. The second-octave D and E♭ are the notes students most often finger wrong, and the correction is the same each time: left first finger up [13].
- Know what comes out. Flute is pitched in C [14], so D5 sounds as D5.
Common mistakes
- Reading the diagram as a mirror. The diagram faces you the way the instrument does when you hold it. Left hand on top, right hand below. Students who flip it end up with the right hand on the upper joint.
- Ignoring the thumb and the register or octave key. These are drawn small and off to the side, so they get missed. On clarinet, forgetting the register key drops you a twelfth into a completely different note [1].
- Treating a half-filled circle as filled. On oboe and recorder a half-hole is its own position, not a hole you forgot to cover.
- Assuming one brass fingering means one note. Open, 1-2 and the rest each produce a whole series of notes. Check the staff note to know which partial you need.
- Mixing up written and sounding pitch. If your clarinet sounds a B♭ when you play a written C, nothing is wrong. Compare written notes with the chart, not with a piano.
- Skipping the tips under a fingering. Notes like low C♯ on trumpet and the clarinet throat tones need an adjustment the diagram alone does not show.
The printables page has one-page versions of each chart, which help most when taped inside a case lid or clipped to a stand. Keep the label at the top visible so the written-pitch note stays in front of you.
Sources
- Clarinet Fingering Chart Legend, The Woodwind Fingering Guide
- Recorder (musical instrument), Wikipedia
- Saxophone, Wikipedia
- Brass instrument valve, Wikipedia
- Trombone, Wikipedia
- Transposing instrument, Wikipedia
- Fingering (music), Wikipedia
- Basic Fingering Chart for Clarinet, Chalumeau Register, The Woodwind Fingering Guide
- Resonance Fingerings for Clarinet, Mitchell Estrin, DANSR
- Trumpet, Wikipedia
- The Trumpet, Brass Techniques and Pedagogy, Brian Weidner, PALNI Open Press
- Second Octave Basic Fingering Chart for Flute and Piccolo, The Woodwind Fingering Guide
- Ten Things Every Band Director Should Know About Flutes, Part 2, Phyllis Louke, Bandworld
- Western concert flute, Wikipedia
- Playing the Oboe, Part 2: Fingers, Ray Still
- Oboe, Wikipedia
- Tuba, Wikipedia
- Euphonium, Wikipedia