Before the first note
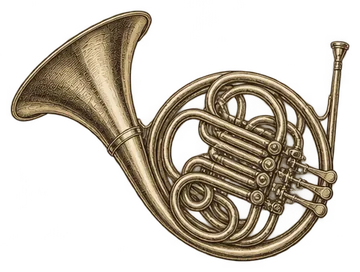
Horn has a reputation for missed notes, and the reason is the length of the tubing. Yamaha gives the F horn's tubing as about 370 cm with no valves pressed, and notes that the longer the tube, the harder it is to land the higher notes correctly [5]. In the range where horn players spend most of their time, the notes that share a fingering sit close together, so it's easy to land on the one next door [1]. That's normal. This guide is built around it: buzz first, start on notes you can find by ear, and add valves one at a time.
Two things to know about your instrument first:
- Single or double. A single F horn is lighter and suits younger, smaller students. A double horn has both F and B♭ tubing and is heavier [4]. On a double horn, the lever under your left thumb switches the horn from F to B♭ [1]. Leave it up for now: the first notes here are all on the F side.
- It reads in F. A horn in F sounds a perfect fifth lower than written [7], so a written C sounds as concert F. Clevenger and Render point out that a horn C won't match a piano C, and that many students don't understand this simply because nobody explained it [2]. The concert pitch guide shows how the transposition works.
When you put the mouthpiece in, slide it in gently. Yamaha's manual says never to force it, because it can get stuck [6].
Step 1: Buzz
Start without the horn. James Boldin, writing in The Instrumentalist, uses free buzzing (lips alone, no mouthpiece) to help students form the embouchure. To get it started, imagine spitting a seed or a hair off the tip of your tongue [3]. His setup exercise: say "emm" with your chin pointed toward the floor, keeping your lower teeth behind your lower lip without bunching your chin [3].
Then buzz on the mouthpiece alone. In their article on first horn lessons, Dale Clevenger and Alice Render have beginners buzz the mouthpiece from the very first lesson, for about 5 to 10 minutes before the horn comes out of the case [2]. Any buzz counts at first. A teacher buzzes along, and the student copies glissandos (slides from low to high) to find the part of the range that feels easiest [2]. Boldin describes a good mouthpiece buzz as fairly loud and healthy-sounding, open rather than tight [3].
If your cheeks puff out, fix it right away [2].
Step 2: Set the mouthpiece high
This is the biggest difference from trumpet and trombone. The horn mouthpiece sits higher on the lips: about two thirds on the upper lip and one third on the lower [1][2][3].
- A way to find it. Clevenger and Render offer an alternative to the two-thirds rule: put the bottom of the rim just inside the pink edge of your lower lip and let the top fall where it naturally goes [2].
- The usual error. Boldin flags too little top lip in the mouthpiece as a common error. It makes the high notes and a true horn sound hard to get [3].
- Check it every day. Mouthpieces tend to creep downward, so watch in a mirror on your music stand [2][3].
Weidner's textbook describes the embouchure itself as flat, with the lower jaw pushed slightly forward. A slight pucker is typical, but he warns that students who are told to pucker tend to overdo it [1]. Boldin uses Philip Farkas's description: a "puckered smile," with neither too much pucker nor too much smile [3].
Pressure is one place horn advice runs against the usual brass warnings. Clevenger and Render found that most beginners use too little pressure and let their lips go slack, and they ask students to press a little more. Few beginners press too hard [2].
Step 3: Hold the horn
Set your posture before the horn arrives. Sit up straight with both feet flat on the floor, a few inches forward from the back of the chair [3]. Bring the horn up to your mouth. Don't bend your head or body down to reach the mouthpiece [1][3].
Left hand. Shape it like a C. The little finger goes in the finger hook, and the index, middle and ring fingers rest on the three valve levers, with the pads of the fingers in the middle of each lever. On a double horn the thumb rests on the thumb valve lever [1][4]. The horn sits at about a 45 degree angle across your body, with the bell to your right [4].
Right hand. It goes inside the bell, and Weidner's textbook teaches it from the very start [1].
- Keep the fingers together and fairly straight, with the thumb against the side of the index finger and the palm slightly cupped [3]. Clevenger and Render compare the shape to a handshake or a soft karate chop [2].
- Put the hand in the bell against the far side, the side away from your body, and let it follow the curve of the bell [3][1].
- The top of the thumb touches the top of the bell, and the bottom edge of the hand rests against the bottom [2][3]. The hand divides the opening in half, so the sound comes out on both sides of it [4].
The hand isn't there just to hold the horn up. It shapes the tone and the tuning. A hand pushed farther into the bell makes the sound darker and lowers the pitch, and a hand pulled back makes it brighter and higher [1]. Clevenger and Render pass on Farkas's guideline: half an inch farther in gives a closed sound, while half an inch farther out has no effect, so too far out is better than too far in [2].
The bell and your leg. Teachers disagree here. Weidner's textbook wants the weight in the hands, not on the right leg, because resting it there encourages twisting and muffles the sound [1]. JMU's brass pedagogy pages leave it to the teacher, noting that the leg helps younger students with the weight but changes the mouthpiece angle [4]. Go with what your band director teaches. Either way, don't let the bell point into your body [1][3].
Step 4: First notes on open valves
Press nothing. Weidner's textbook says most beginners find their comfortable middle notes around the 3rd to 6th notes of the horn's harmonic series [1]. With no valves down on the F horn, the French horn chart shows these open notes:
| Written note | Where it is | Valves |
|---|---|---|
| G3 | The G below middle C, under two ledger lines | Open |
| C4 | Middle C, one ledger line below the staff | Open |
| E4 | Bottom line of the staff | Open |
| G4 | Second line of the staff | Open |
For the first note, Clevenger and Render have the beginner hold a whole note on whichever of these comes out most easily: C, E, G or low G [2]. Then they use C as home base, add G, and build an octave of good notes out from those two [2].
Because all four share one fingering, your ear has to pick the note. Weidner notes that students often land a second or a third away from the note they meant, on the neighboring note in the series [1]. Before each note, tap its card on the horn chart to hear it, then hum it, then play it.
Check what you played on the French horn tuner. It shows the note the way it's written in horn music, with the concert note underneath, so a written C shows as C with "sounds concert F" on the line below.
Step 5: Add valves for F, G and A
Your first song uses the open G and two neighbors:
| Written note | F horn valves | Where it is |
|---|---|---|
| A4 | 1 and 2 | Second space |
| G4 | Open | Second line |
| F4 | 1 | First space |
These are the F-side fingerings. On a double horn, Weidner's textbook has beginners use the F side for G4 and below and the B♭ side (thumb down) above G4 [1]. That makes the A the first note where the thumb might come in, so ask your director which way to play it. The horn chart lists the B♭-side fingering under every note.
Worked example: a 15-minute first session
- Minutes 0 to 5. Free buzz, then mouthpiece alone [3][2]. Slide around the range and settle on a comfortable pitch [2].
- Minute 5 to 6. Check the mouthpiece placement in a mirror: two thirds upper lip [2][3].
- Minutes 6 to 8. Set up the horn: left hand in a C, little finger in the hook, right hand cupped in the bell, horn at about 45 degrees [1][4].
- Minutes 8 to 10. One long open note, whichever comes out [2]. Read it on the tuner. If it was the C, play it three more times as home base [2].
- Minutes 10 to 12. Find the open G above it. Hear it first on the chart, then play it.
- Minutes 12 to 15. Add F with valve 1 and A with valves 1 and 2, then play Hot Cross Buns. The site's horn version uses exactly these three notes, A, G and F, so the fingerings go 1-2, open, 1.
When it goes wrong
- The right fingering, the wrong note. You landed on a neighbor [1]. Hear the note before you play it. Weidner suggests pitch-matching games and learning the intervals between the open notes, so you can check your starting note at home [1].
- A bright, sharp, splintered sound. The right hand is out of the bell or the horn is resting on the leg [1].
- A dull, muffled sound that sits flat. The hand is too far in, or the wrist has collapsed across the bell. Keep the hand gently cupped, fingers together, and picture it as part of the bell's curve [1].
- A fuzzy start to each note. Clevenger and Render get the cleanest attack with the tip of the tongue touching the bottom of the upper teeth. Tonguing higher up, on the teeth or the roof of the mouth, makes the attack fuzzy [2].
- High notes won't come. Check for too little top lip [3].
- Small hands. The valve levers can be adjusted for height, and extensions exist, so ask your director before stretching [3][4]. Boldin also suggests a three-quarter size horn for small students [3].
- Braces. Boldin calls the loss of range and comfort temporary. Avoid heavy pressure, and use brace guards rather than wax, which can get blown into the horn [3].
Common mistakes
- Mouthpiece too low on the lips [3].
- Bending down to the horn instead of bringing it up [1][3].
- Curled or spread fingers in the bell, or the hand pushed in too deep [3][1].
- Bell pointing into the body, which muffles the sound [1][3].
- Using the thumb valve at random. Treat it as part of the fingering, the way the chart shows it [1].
- Forcing the mouthpiece in [6].
When you tune with the band, keep your right hand in the bell, since moving it changes the pitch [1]. On a double horn, Weidner's order is to tune the B♭ side first on a written C, then the F side on a written C or G [1]. Which slide does which depends on the horn. On Yamaha's double horns, its manual says, the main tuning slide tunes the B♭ side and the F tuning slide tunes the F side [6].
Sources
- The Horn, Brass Techniques and Pedagogy (Brian N. Weidner), PALNI Open Press
- First Lessons on Horn (Dale Clevenger and Alice Render), The Instrumentalist
- Teaching Young Hornists (James Boldin), The Instrumentalist
- Horn Set-up, Brass Pedagogy, James Madison University
- How to Play the Horn, Yamaha Musical Instrument Guide
- Horn Owner's Manual (PDF), Yamaha
- French horn, Wikipedia